Thursday, May 9, 2019

May Day, new projects

Happy spring, May Day & Beltane! I know, they have come and passed already. But I am here to re-cap, update and share photos with you!

I again decorated my weeping cherry blossom tree with ribbons like a May pole! My tree has easily grown by 2"s already this year. I ended up with ribbon a tad too short then usual. But that's okay, I wrap and braid it around and tie it with a big bow.


I enjoyed my spring floral crown of faux pink roses and ribbons. I actually intend to make a (yet another) floral crown with some faux butterflies this year. I have some parts of it sitting in my craft room but I may need to match some new ribbon.

my decorated great-grandma's straw hat

my rose spring floral crown

I have also become busy with my resident seamstress work! About every 4 weeks or so I bring my sewing machine to my martial arts school. I sew what students bring for a good 2 1/2 hours but I also happily take home anything they drop off. I currently sew on patches, hemming and repairs. I enjoy helping them get their uniforms in tip top condition and personalized.

sewing on patches

my little online signage

I'm still busy on Instagram & Etsy. I recently opened a new Facebook page for my crafting, so do stop over. Visit the new page here: facebook CraftinessbyB


Tuesday, February 19, 2019

Eco-friendly Flannel Toner Pads

A new year calls for some new projects! Some I want to share and make are eco-friendly in nature. I want to have less wasteful items that I use daily in the home and even my beauty routine. Enter: re-useable toner pads.

What I used for these are flannel pieces, three layers total. This gives some thickness and any toner absorbed won't simply drip out of the fabric. You could also add a layer of another fabric if you want this to be thick and absorbent.


I decided to make my toner pads round, so I found a suitable circle shaped object and simply traced it. You can pin your layers together, with a traced shape, then cut! This will save you time and makes sure the shapes are all matching.


I made three rounds total, so see how I liked the size. You can make as many as you please or simply start with one and decide from there. Once you have the pieces cut, you should pin them together. You want any printed side facing IN, as after sewing, you TURN your shape inside out. 


As an added pretty detail I put a small ribbon loop. If you decide on something similar, be sure the loop end is facing inside, as shown above. This loop is also handy for later on: you can easily hang the toner pad up to dry! When you sew your toner pad be sure to leave about 1 inch that you do not sew, you need an area to turn this inside out. 

Once you turn the toner pad inside out, you can hand sew that small opening. I decided to add some decorative stitching on the edges of mine. If you machine has this feature be sure to test it on a scrap piece of fabric beforehand. That way you can decide how close to the edge a design will stitch.

my finished, re-useable toner pads


edge design and ribbon detailing

This is a nice DIY project for those wanting to try the fancy stitching on your machine. It's also a nice project if you want to introduce more washable, less wasteful, home and beauty items. Cotton pads and makeup wipes end up in landfills. If you want to aim to reduce waste you can easily introduce these into your home and routine. They offer a nice product that is less wasteful, washable, lasts years and you can customize them how you please. If you enjoy what I share and make be sure to visit my Etsy shop and Instagram


Monday, January 14, 2019

Etsy Shop Winter SALE!

It's a new year and winter has arrived. So to make way for new products in my Etsy shop I'm having a Winter SALE! It is from 1/10 - to 1/31 and is 20% off orders of $16 or more (not including shipping).


online only from 1/10 to 1/31
seasonal and holiday gifts

Consider browsing and buying from my online shop and supporting handmade. Buying handmade is supporting skilled trades, small business and women entrepreneurs. My shop opened in 2008 and continues to offer wonderful, quality handmade gifts.

bags, purses and clutches


pet bandannas!

Handmade means sweatshop-free. Made by hand, often by only one artist or seamstress. Which means what you buy has been in the hands of one talented person! In my case I've been the sole artisan and seamstress of my Etsy shop. I have learned my skills from 3 generations of family since I was about 6 years of age. It's my passion and joy to make and create gifts for people who value handmade.

felt charms and mascots

This sale is going on from January 10th to the 31st. No special discount code is needed for this sale, simply add items to your shopping cart totaling $16.00 or more (not including shipping costs). Thank you for visiting my shop and I hope your find something you'd love to own!

Friday, December 21, 2018

Happy Winter Solstice & Merry Christmas

My oh my, where has the time gone?! Autumn was far too short for us here and winter arrived with a bang. And as soon as we had our first snowfall, we now are so warm in weather you would think it was spring time!

first snowfall

If you follow my Instagram (and you should!) I have shared everything from Halloween and cosplay props and costumes, to handmade gifts and DIY for all ages. Currently I have up several simple, all ages gift ideas. This week I shared some simple hair bows on bobby pins, made from velvet ribbon. 

velvet hair bow ribbon

finished in time for festiveness!

In the coming year of 2019 I hope to start up my YouTube channel once again. I've had a lot of requests for beginner sewing videos and tutorials. I'd love to share the basics of setting up a sewing machine. As well as simple, beginner projects that won't break the piggy bank. 
I also hope to share my many (many) pattern and sewing books! I have used ones, vintage ones, special ones from other countries ~ so many things to make, only so much in my craft budget.

newly acquired vintage book

So from our family to yours: warm winter blessing, Merry Yuletide, Blessed Winter Solstice, Merry Christmas, Happy Hanukkah and a very Happy New Year! 


Tuesday, September 25, 2018

Autumn arrives, repairs to sweater & floral crown

Hello, how are you? The air is crisp, the weather has cooled and foliage is ready to begin! If you've been following me on Instagram you will see I've been quite busy. So I will share a few more things in this post that I had shared briefly in IG.


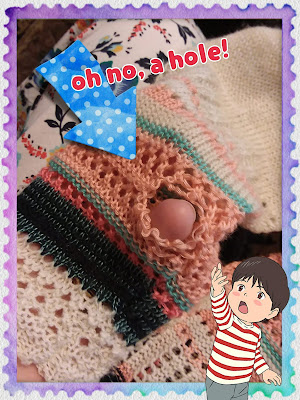
I love thrift store finds and this sweater was one of them. But it had a hole at the sleeve near a seam. So how do you go about fixing this up? I decided to crochet the hole to repair it. I used embroidery floss that matched the peachy color. 

A very small crochet hook and peachy floss


I turned the sleeve inside out, so I worked in the back section. This better allowed me to crochet into some of the loose yarn on the sweater. The goal was to close the hole and not leave any of those loops of yarn un-crocheted. This closed the hole while having some matching floss and since it was no bigger then a quarter in size, it's not that noticeable. You could use this method on most sweaters and you don't need to be fancy in the repairs.

I've begun some Halloween projects I want to list on my Etsy shop! I decided on some drawstring bags with themes on them. So far I have two in the works, as seen below. I hand stitched the jack-o-lantern and black cat. I then stitched them to my chosen fabric. 


The black cat has such fine details to the fur! I gave it texture and whiskers along with a little nose and bright eyes. The drawstring bags I have made from scratch! No pre-purchased, pre-made bags here! I really value making and offering quality, handmade items for sale. 


details of the jack-o-lantern bag

If you have followed either of my Instagram pages: one for my Etsy and crafting, one for my photography, then you will recognize these floral crowns. I absolutely love making them for the seasons! I may even have one made in time for winter to sell in my Etsy shop (so follow my Instagram accounts to find out!). This is my autumn/later summer themed floral crown.


my handmade floral crown

summer solstice

I use faux flowers so you can keep the crowns and wear them for years to come. But in the past I've also made some from natural resources and they lasted about a week or less. They are a real passion for me and I want to share them with others. Be it for dress up, a special occasion or festivals, they have many uses. I plan them out from the faux flowers and foliage I pick. They often have a color scheme and I just work on them organically, letting the vision of what I'd like it to be flow. 

I hope you've enjoyed these photos and crafty updates! Be sure to visit my Instagram accounts and see what I'm up to, along with videos regularly.