Friday, December 21, 2018

Happy Winter Solstice & Merry Christmas

My oh my, where has the time gone?! Autumn was far too short for us here and winter arrived with a bang. And as soon as we had our first snowfall, we now are so warm in weather you would think it was spring time!

first snowfall

If you follow my Instagram (and you should!) I have shared everything from Halloween and cosplay props and costumes, to handmade gifts and DIY for all ages. Currently I have up several simple, all ages gift ideas. This week I shared some simple hair bows on bobby pins, made from velvet ribbon. 

velvet hair bow ribbon

finished in time for festiveness!

In the coming year of 2019 I hope to start up my YouTube channel once again. I've had a lot of requests for beginner sewing videos and tutorials. I'd love to share the basics of setting up a sewing machine. As well as simple, beginner projects that won't break the piggy bank. 
I also hope to share my many (many) pattern and sewing books! I have used ones, vintage ones, special ones from other countries ~ so many things to make, only so much in my craft budget.

newly acquired vintage book

So from our family to yours: warm winter blessing, Merry Yuletide, Blessed Winter Solstice, Merry Christmas, Happy Hanukkah and a very Happy New Year! 


Tuesday, September 25, 2018

Autumn arrives, repairs to sweater & floral crown

Hello, how are you? The air is crisp, the weather has cooled and foliage is ready to begin! If you've been following me on Instagram you will see I've been quite busy. So I will share a few more things in this post that I had shared briefly in IG.


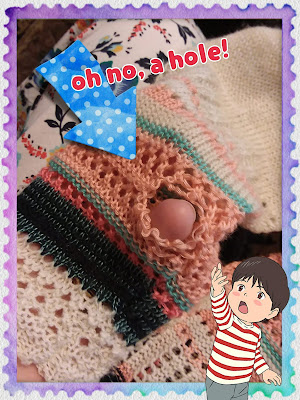
I love thrift store finds and this sweater was one of them. But it had a hole at the sleeve near a seam. So how do you go about fixing this up? I decided to crochet the hole to repair it. I used embroidery floss that matched the peachy color. 

A very small crochet hook and peachy floss


I turned the sleeve inside out, so I worked in the back section. This better allowed me to crochet into some of the loose yarn on the sweater. The goal was to close the hole and not leave any of those loops of yarn un-crocheted. This closed the hole while having some matching floss and since it was no bigger then a quarter in size, it's not that noticeable. You could use this method on most sweaters and you don't need to be fancy in the repairs.

I've begun some Halloween projects I want to list on my Etsy shop! I decided on some drawstring bags with themes on them. So far I have two in the works, as seen below. I hand stitched the jack-o-lantern and black cat. I then stitched them to my chosen fabric. 


The black cat has such fine details to the fur! I gave it texture and whiskers along with a little nose and bright eyes. The drawstring bags I have made from scratch! No pre-purchased, pre-made bags here! I really value making and offering quality, handmade items for sale. 


details of the jack-o-lantern bag

If you have followed either of my Instagram pages: one for my Etsy and crafting, one for my photography, then you will recognize these floral crowns. I absolutely love making them for the seasons! I may even have one made in time for winter to sell in my Etsy shop (so follow my Instagram accounts to find out!). This is my autumn/later summer themed floral crown.


my handmade floral crown

summer solstice

I use faux flowers so you can keep the crowns and wear them for years to come. But in the past I've also made some from natural resources and they lasted about a week or less. They are a real passion for me and I want to share them with others. Be it for dress up, a special occasion or festivals, they have many uses. I plan them out from the faux flowers and foliage I pick. They often have a color scheme and I just work on them organically, letting the vision of what I'd like it to be flow. 

I hope you've enjoyed these photos and crafty updates! Be sure to visit my Instagram accounts and see what I'm up to, along with videos regularly. 


Friday, August 17, 2018

End of Summer, foster kittens, Home repairs!

Hello August! I swear, this month gets warmer each and every year now. But soon, those autumn temperatures will be joining us shortly. The trees foliage has not started yet but the leaves are beginning to fall.
I had some short staying visitors ~ foster kittens! They arrived at my home as orphans and just 5 weeks old. They were sisters and it was unknown what happened to their mother (or any other litter mates). The runt of the two had some special needs that I was informed of. She seemingly was much smaller then her sister and had a underdeveloped jaw. She may have other issues yet unknown, since she was quite small.
the littlest one, named Felicia

her sister, Freida

Needless to say some fosters have more challenges then others. These two were not litter trained at all. Despite my best efforts they returned back to the shelter about 9 days earlier then expected. I tried my best, had two littler boxes, they had their own room - but as a volunteer I could only do so much. Also a concern about Felicia not growing as fast as her sibling was something the shelter wants to address. I volunteer for a no-kill shelter which never turns away special needs or special medical care pets. I can pop in whenever I want to check on their progress!

In the meanwhile, I had been doing small home repairs and redecorating! If you ever have a house you will know how daunting even the smallest of tasks can be. I wanted to re-paint the closet shelving along with re-paint the closet door in our bathroom. My husband kindly stripped the old paint off the door - turns out, it was solid wood. I picked a pale blue shade since the walls are a pale grey colour. I've been posting with updates of my project on my Instagram page for my crafting. It did come out nicely and I'm happy we did this ourselves!

the before and after of the closet shelving

before the finished project

I decided to add something to hang my many hair decorations up on. I decided on cork board and floral pins! It was very affordable and an easy project for any novice to try. This way my barrettes, clips and other hair decorations are easily visible. And the floral pins have a pearl faux end to them, so you can hang elastics easily. It made for a simple way to display things without needing any nails or tape to keep the cork board in place.

square cork board and large floral pins

the finished project

easily find hair items and can move the pins as needed

I hope you have been enjoying the end of summer where you live. We have had some record breaking hot days here and I'm happy they are behind us. It won't be long now and we will all be bundling up in layers and the foliage will be here! Com on autumn, I am looking forward to you arriving!


Wednesday, July 4, 2018

Welcome Summer, Vest repairs, baby gift

Let's all give a warm (ha, get it?) welcome to the summer season! It's hot, it's humid and you want to stay indoors and in the cool breeze of a fan. So what have I been working on? Plenty of things, that's for sure! Of course stop by my Instagram to view weekly things I do or share about.

Each season I enjoy decorating and celebrating the season. On June 21st we had Summer Solstice, which did these photos for and a staff.

summer decor

summer solstice

I've been sewing, crafting and doing repairs to thrifted clothing I already own. The vest above needed some TLC recently. The piping on this (the edging) was frayed and just falling apart with time. So how do you repair that? Well I wasn't going to tear apart the piping edge on this! Instead, I find a simple (beginner. easy) solution that can be done in an afternoon. 


a paint brush and puff paint


before & after

I purchased puff paint to make repairs with. I used a dark brown shade which matched perfectly! With the use of a paint brush, I could simply dip it in puff paint, then paint the piping. This left a nice smooth coverage and no more frays or cracks! Just put down a little paper and use a wide brush, easy as that.

plush toy pattern design

I am also working on a toy plush for a friends soon-to-be baby boy (due in autumn). I based this off Nightwing from the Teen Titans series. Since it's for an infant I kept a simple round pillow shape to it. I am going to use flannel fabric, felt and sew it mostly by machine. I try to never put any pieces that an infant can tear off - safety first! So no buttons, ribbons or the like. I only recently cut the pattern pieces out and traced them onto fabric.

If you are in the mood to shop for handmade gifts, do visit my Etsy shop (linked in the side bar). I have over 35 items for sale currently. I have felt creations, plushes, hair accessories, upcycled clothing and much more! Support small business, support artisans and gift handmade when you can. 


Saturday, May 19, 2018

Spring equinox, Instagram, Bee house

Hello and how are you? Spring has arrived and summer is on it's heels. I broke out the floral crown for spring equinox ~ I even had something special in store for my weeping cherry blossom tree.


I celebrated the new season by dressing in pastels and turning my tree into a Maypole! I broke out the ribbon and went about braiding it around the trunk. It came out really lovely and I kept it up for a few days in the nice spring weather. 

Spring Equinox

my Maypole tree

I wrapped the ribbon at the top and began braiding it around the trunk as I went down. You can treat this like you might a French braid or a four strand braid. Or you can just wrap it in alternating directions downward. At the bottom I simply tied a bow with my ribbons. 


Fun was had, the weather was wonderful and I enjoyed myself. If you like daily or weekly photos, videos and DIY's please stop by my Instagram! I have one devoted to crafting, which is the Craftiness by B one (see my links in the side bar). For non-crafty things I have an Instagram for that as well, which is my BerthaBee Photography. I share natural beauty, health, animals & pets, vintage and other styles I'm enjoying. 

Now for more projects I've been up to! A top project I had was to paint and hang up my bee house. I bought one from a local hardware store this spring. It's made with bamboo wood and is meant to encourage wild bees to turn it into their hive. I painted the roof red because... I needed a way to find it in my wooded backyard. But also to encourage bees to investigate it (red is bright like flowers). I hung it up and am awaiting the new bee house guests. 


bamboo bee house

I used acrylic paints with a water based sealant. This way it can hold up well over the months in various weather. Due to it being made with bamboo, it's unlikely to rot any. And the round bamboo pieces inside are there to encourage a hive to take up. Now that all the flowers are blooming I do hope to see some bees move in soon enough!


Tuesday, March 20, 2018

Thrifty fun, alterations and kitty wings!

Hello, and since it's today ~ Happy Spring Equinox! 

I have been going through my wardrobe the past several weeks. Weeding out clothing I no longer wore, had out grown style-wise or just found to be too worn out. I always donate my gently worn clothes to several local places. And of course, I end up at the thrift store seeking new clothes! It's my number one place for gently worn, pre-shrunk clothing finds. 
In doing that I often find pieces I love but want to improve upon. It could be a simple change in buttons or altering it to fit my figure better. If something is too small you can add width in several places. The first can be at the zippers, which I will touch upon next month (currently doing just this to a skirt!). The second is to add width under too-tight arms. Some are very easy alterations for any beginner while others can be more involved.
Here is a pretty blouse I picked from the thrift store recently. It's vintage, I suspect from the 60's and the white buttons it came with just had to go.

I took the original white buttons with me shopping at a craft store. I picked the same size to fit the current button holes. I simply cut the old ones off and added the new black buttons. It's all done by hand and is an easy change for any beginner seamstress.

here is the thrifted blouse with new buttons

My other fun project was new kitty wings for my fluffy cat who wears a harness (because he is a puppy cat!). In the past I have made him fairy wings, which I have shared in a post with adorable photos. But since I made the dog a dragon wing cape last year, my cat needed some too. 


dragon wings for my cat

These are very light weight and made from pipe cleaners and tulle. I hand stitched around the wire to make sure the tulle didn't come of. If you follow me on Instagram (click my side link to find it) you can see videos of my pets and my cat in this adorable winged costume!

dragon cat

I hope spring is arriving for you soon enough! Our flowers are trying to poke up from under a blanket of frost and a dusting of snow. Do visit my many links to keep up with me on a weekly basis. 


Wednesday, January 31, 2018

Decor, a Sleep mask and my Pets

Hello and welcome to 2018! I know, several weeks late and almost a month so (ha haha!). Winter has been a mixture of storms, warm spells and my pets having little colds. I know, the poor fur babies!

So if you have not paid my etsy shop or Instagram a visit ~ you should! I update with photos, new listings and projects I am working on. I also enjoy posting short videos of projects, techniques or things I have found in craft stores. You can also keep up with me on those places since I enjoy posting often.


my DIY fawn sleep mask
An ongoing project is my Fawn sleep mask. This is a project I've had going since last month. I used a homemade pattern based off a current sleep mask I have. From there I sketched ideas of what I wanted to make, coming to the idea of a fawn or deer. I used cotton printed fabric, flannel for the back (against your eyes) and felt for the ears and antlers. You can use any elastic for the piece that goes around your head, I used soft elastic used for clothing.

I also made a new front door decoration for the coming of spring. I based it on Saint Brigid's cross. She is often associated with Ireland and Gaelic stories and lore. Her cross is unique in it's shape and is weaved from many types of materials. I used faux grass reed, flower and ribbon for my decor. And on the back I did add some glued spots to keep it together in the outside weather. 


my St.Brigid's cross

So far no birds have decided to use my decor for their nests. It was an afternoon project that I greatly enjoyed making. You can also find many tutorials online about how to weave the middle cross part. Once you get the hang of it it's not too difficult for children to learn as well. Mine is hung on my front door but can also be made smaller and hung on the hearth of ones home.

And now for my pets - goodness me! Our calico got sick and needed medicine. And if you have a large cat (she is 13 pounds) you know what a challenge it is to trick them into taking it. The dog got quite sick after a vet visit, we think he caught something while there. The poor boy, you could tell how uncomfortable he was. Off to the vet (again) to give him medication and a shot, he has since recovered. And the boy cat, my fluffy mutt. He surprised us all! He is newly diagnosed as diabetic. The veterinary first suggested we try a special RX food for him. We return for a follow up next month to see if insulin daily will be the next step.

my boy, Howl cat
So next month I hope to share more projects, new listings in my shop and pet updates! Be well friends. Please be sure to visit my Etsy shop and Instagram, links on the side bar.